Monday, October 31, 2011

IT'S TIME TO PARTY


Welcome to our home. We're in the process of preparing for our Halloween party.


A few of our friends have already arrived and are busy putting together a little special something for the party.


Here are two who seem to be enjoying themselves. It would seem they've had too many sweets and the sugar has them doing some silly things and the party isn't set to start for several more hours.  


I ain't afraid of no ghosts!! Don't worry I've got things under control. Those ghost know better than act up now that I'm here.

Happy Halloween 

We want to wish everybeary a safe and happy Halloween.

Your beary good friends Bellamine & Wendy

Sunday, October 30, 2011

WHAT? ANOTHER SNOWMAN?

What can I say? I'm on a snowman binge. I can't believe how good it feels sculpting with paper mache clay again. I'm trying to take it slowly and not overdo but when it's this much fun it's hard to take it slow. So far my hand is holding up and I'm getting a few pieces ready for the online Christmas craft show. My goal is to complete six snowmen for the show and this is the fourth one that I've finished. The final two are nearing completion and should be finished within the next week. 

Without saying more it is my pleasure to introduce Seymour the snowman.

I just love the way his little carrot nose turns up.


I really like the way the metallic paints look when dry brushed over the base colors. They look much nicer in natural lighting but since it's so dark here this time of year I have to make do with my light bar and flash.

Seymour and the other snowmen that I've posted so far are between 8 1/4" and 8 1/2" tall and 3" wide. This makes them the idea size for decorating is tight spots. I intend to sit one of my snowmen on my fireplace mantel beside a brass candle holder.

Just a reminder, the Old Fashioned Christmas Craft Show is less than two weeks away.


Hope you've enjoyed seeing another snowman and  you're having a wonderful weekend.

As always, thanks for stopping by.

Friday, October 28, 2011

ANOTHER SNOWMAN

As you can see from the title of this post I've finished another snowman. Sometimes I get a notion to do something that's not what is normally expected or accepted but I just have to do it anyway just to get it out of my system. The funny thing is my sister Maggie had the same idea so maybe our brains are connected. Anyway, I'm going to just go ahead and show you this new guy without saying too much about him until after you've seen his photos.


Yes, he's got a beard. I know most snowmen doesn't have beards but there really isn't any reason for them not to. He also has some sparkles and I see some sparkles are showing up like blue dots in his fur collar.

I really wish I could get the colors to show up more natural in the photos as they are much nicer looking. In the photos there doesn't seem to be much difference between the color of the hat and the coat but there is. I used terra cotta, chocolate brown, russet and sand stone to name just a few of the colors used in his clothing. He has a wreath hanging on his right arm and it is trimmed with a pine cone and red berries.

I'm not at all unhappy with the way this little snowman turned out. Oh, I nearly forgot, his name is Oscar.

I hope everyone is well and happy and being productive or not, depending on what your goal is at the moment. I know some of you are getting excited about Halloween being only a few days away. 

As always, thanks for stopping by.

Wednesday, October 26, 2011

SNOW LADY

It might seem like I'm making these snow folk up really quickly but truth be told they seem to be taking forever. The humidity and temperature in my work shop must be all wrong for drying because the pieces I started on nearly two weeks ago are just barely getting to the point where some of them are ready for painting. This is the second snow person in my new series and since I really do like this new style I hope to get a few more done before the online Christmas craft show.

Where the last one was painted in warm colors I opted to paint this one in what I feel is a more traditional color scheme.


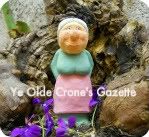
I love her happy face.


and what a cute profile


She even has a waist line.


To me snowmen and women seem to be such happy folk.


After painting her using three shades of blue and a bold splash of a gold for her scarf and mittens I used a walnut stain to give the piece an aged appearance then  I brushed white pearl over the entire figure.  It's hard to see in the photos my little snow gal almost looks like she's made of metal. Usually my figures appear to be carved from wood so this is a bit different.


I think this little snowman and my newest piece make a cute couple don't you? 

I hope you enjoyed seeing my newest little snow person. I really enjoyed working on her and speaking of work I should get back to it.

As always, thanks for stopping by.


Tuesday, October 25, 2011

I SEE SNOWPEOPLE

When I first started sculpting with paper mache clay I made snowmen or more precisely snow people. My first piece was a little girl I named Crystal followed shortly by her siblings Little Flake, Crispin and Little Sleet. I also gave them parents. After creating the snow family I turned to sculpting Santa figures and never made another snowman. It was Santa all the way until I switched to my witches etc.

Here is a photo of the snow children.


From left to right is Crispin, Little Sleet, Crystal and Little Flake. The reason I'm even showing you my little snow people now is I've come full circle and am again making snowmen. I'm working on a new style and have completed the first of however many.


I've given the snowmen a different shape and have painted this one quite differently than I did my earlier ones. This new one is 8 1/4" tall and 3" wide which makes him fairly small. I didn't use a stain to age the earlier ones like I did this fellow and this newest snowman's clothing has a metallic sheen.


I know the colors I used on this little snowman aren't typical for snowmen. The colors are usually cool and often lighter. I used avocado, terra cotta and russet with other green and red under coats. After sealing and staining the piece I dry brushed spun gold over the clothing and brushed white pearl over the snowman. His eyes are small black beads.  

I'm hoping to get a few more of these snowmen completed so they're ready for the online craft show. Let me know what you think of this new style. It's always difficult for me to be impartial as I seem to form attachments to my little people while I'm working on them.

I hope you enjoyed seeing what I've been up to. I've got 4 more that are nearly ready to paint and will show them to you when they're done.

As always, thanks for stopping by.

Sunday, October 23, 2011

MORE OF MY DOLLS

I thought that since I've been busy making but not completing anything I'd show you some more of my dolls. These are some from the doll cabinet. The first one was made by my sister Marlene and given to me as a gift when she found out that I coveted a Linda Mason Tiffany doll. Tiffany's hair was braided across the the top of her head and was adorned with small rose buds and babies breath but over the years the rubber bands dried up and fell apart. She was also carrying a small basket of flowers but my granddaughter "borrowed" it when she was about 5 years old and I haven't seen it since. The doll is still lovely and one day I will figure out how to fix her hair.


Isn't she lovely? Because Marlene did such a wonderful job with this doll I decided to take classes with her.

The next doll is a Linda Mason doll that I cannot remember the name of. I wanted her because she reminded me of my daughter Kimberly when she was about 6 or 7 years old.


The next doll is a "Brian" by Stewart Sherwood. I have a few boy dolls in my collection as having all girls is a bit boring.


I think that one of the reasons I wanted this little guy was because of his hair. I have a thing for red hair in case you haven't noticed. The three dolls I just showed you share the bottom shelf of the doll cabinet.


The larger of the dolls shown in the pictures above was my mother's when she was a child. I made the dress and the reason for the closeup of the shoes is they were worn by my son when he was a baby. The raggedy doll was made by my sister Maggie and I think it's adorable. Here I'm always worrying about the clothing on my dolls getting yellow or stained with age and Maggie went and stained the clothing on this little doll on purpose. 

The quilt the first three dolls were photographed in front of is the one that Maggie pieced together for me for my antique doll carriage. I'd asked her to make a quilt top that would look like an antique and she did a wonderful job.

I sure hope I didn't bore you to tears showing you some more of my dolls. Just so you know, there are three more shelves in the doll cabinet.

As always, thanks for stopping by.

Tuesday, October 18, 2011

Some of my dolls

I've decided to share a few pictures of some of my dolls. It's a fairly small collection as I'm not a serious collector just a woman who has to have some toys.

The first doll I'm going to show is one that was given to me by my great aunt Becky when I was twelve years old. I made the clothing that she has on about 25 years ago. She lays in a baby carriage that I purchased about fourteen years ago. The quilt in the carriage was pieced together by Maggie and quilted by me. The doll is a Armand Marseille Dream Baby.


She has held up much better than I have over the years.


The next doll is one that I made to look like my grandson Donovan at 18 months of age. My sister Marlene and I took classes to learn making porcelain dolls 18 years ago. Marlene made several while I made just the two that I'm going to show you.


Donovan had the fluffiest pale blond hair when he was young and the bluest eyes. Here he's dressed in his Christmas romper with a white turtle neck sweater.

Since I'd made a doll to look like my grandson it was only fair to make one to look like my granddaughter Ariel.


This is what Ariel looked like at 8 months. She's also dressed for Christmas. I designed the little jumper she's wearing.

The next doll is my one attempt at making a doll using FIMO modeling clay.


His name is Wee Willy. Although he was fun to make I never made another. I've had the little Jack-o-lantern in a couple of pics and I believe I mentioned that Maggie made it.  

I know that I'm not the only woman who has to have her toys. I've seen some from time to time on other blogs and figured that I'd show you some of mine. 

Don't forget to mark November 11th, 12th and 13th down on your calendar for the Old Fashioned Craft Show.  There are some very talented artists who will have some wonderful and unique items for sale.


As always thanks for stopping by.

Sunday, October 16, 2011

Old Fashion Online Christmas Craft Show

Hi, Ladies!

Please "Save the Date" for the weekend
of November 11th, 12th & 13th

for ORP's
"Old Fashioned Online Christmas Craft Show"!

Please join us for this very Unique & Special Event!

Meet some very talented artists!

You will have the opportunity to purchase
some unique, handmade, one-of-a-kind items!

The "Best" part of all is you don't even have to leave your home!
Shop online from home!

Below you will find a list of all of our 
"Christmas Craft Show" Participants...
Looking forward to seeing you then!!!

Friday, October 14, 2011

Enchanted Tree

At the bottom of my last post I showed you a photo of an enchanted tree that Maggie had designed and is selling the pattern for it on her blog. I really love this little tree and had to have one of my own so I had Maggie send me the pattern.

While making this little guy I learned a couple of tricks from Maggie that I hadn't known before as I really haven't made any fabric art dolls this size. One thing I learned is it's not easy turning something this small right side out. I called Maggie and asked how in the heck did she manage it and that's when I learned about using a soda straw. Huh? I asked when she told me to use a straw. What does a straw have to do with turning something inside out? She told me that's how she turns fingers and such on her art dolls and then told me how to do it. You insert the straw inside what you want to turn and then poke the fabric with the smooth end of a crochet hook into the straw. It works like a charm. See, you can teach an old dog a new trick. Not that I'm old or anything.

Here's Maggie's Enchanted Tree:


Isn't he the cutest darn tree ever? I love the fabric she chose for the tree and how it goes with the fabric she used for her crow. When I shopped for the fabric for mine I kept that in mind and found a black and a brown that that had a matching pattern.

Here's my Enchanted Tree:


Maggie used doll eyes when she made hers but since I didn't have any I constructed mine with white felt and black beads. I also gave mine a pipe cleaner nose instead of wrapping a wire with fabric mainly because I had a brown pipe cleaner. 

Here's a closeup of her crow:


He looks so cute sitting on the branch. What's really fun with these guys, the tree and the crow, is they can be positioned in so many differented poses. The fingers and arm and branches if you want them to have wires inside. When Maggie posted this guy she had him assume different poses. I've been doing that with mine since I finished him yesterday. I'm going to wear him out at this rate.

Here's a closeup of my crow:


If you think the leaves on my tree look different than the one's on Maggie's it's because I made them differently. My sewing machine was acting up again and wouldn't let me stitch the edge of the leaves without messing them up so I decided to make them without sewing. I glued the fabric to both sides of some heavy paper and them traced the leaf pattern on the fabric and cut. I used paint to add the detail to the leaves.

I think one of the things I really like about this pattern is the flexibility you have when making it. There are three sections to the tree and when joining the sections you have the option of putting section "A" on the right side or the left side and by doing so have changed the appearence of the tree. As you can see by looking at Maggie's tree and mine each is unique. I'm thinking of making this tree in different fabrics for the different seasons and different rooms in the house. I'm also thinking about making one for my daughter and another for my granddaughter as gifts.

Well, I've got to run. Places to go, people to see and things to do. This month in moving along too fast for my liking and Halloween will be here before you know it. I still haven't finished my decorating and I don't have much time left. I do want time to enjoy it before I have to take it all down and start decorating for Christmas.

As always I want to thank you for stopping by.

Tuesday, October 11, 2011

My Sister Maggie

As many of you know, I have two sisters who also are artists and who have their own blogs.  One of my sisters, Maggie from Off My Rocker is going to have one of her pieces in the November issue of Art Doll Quarterly.  I'm thrilled for her. She is an amazing artist and I decided  to do a post showing some of her work.

The following is a sample of her work:


This is one of her paper mache clay Santa figures. I love this piece and am hoping I get this one for Christmas. [hint]


This Santa is another of my favorites. Don't you just love the bunny slippers? Check out the mug of hot chocolate, it has mini marshmallows melting in it. It's all in the details for Maggie. She never misses a thing.


Here's another of her wonderful Santa figures. You have to see this one in person to fully appreciate it. The little bunnies alone are a work of art.


How about this young lady? Have you ever seen anything quite like her? You should read the story that goes along with her.


This is one of  a series of 13 witches that Maggie's will be working on over the next two years.


Here's one of her fabric art dolls. I love this piece and wouldn't mind getting this for my birthday. [hint] Her name is Audrey and she is stunning, don't you agree?


I visited Maggie shortly after she had made these little lovelies. I fell for these six little dolls in a big way. I cannot stress enough how pictures do not do them justice. The painting on the pieces alone is something you need to see in person. I wouldn't mind having this group end up under my Christmas tree. [hint] 


This is one of Maggie's fabric art dolls and she's selling the pattern to make it. Guess who has one of the patterns. Yep! I'm making it as soon as I get to a fabric store. I thought I had enough fabric on hand when I ordered the pattern but discovered I was way short. Darn.  I love that the tree, the crow and leaves can be positioned however I want them.

As you can probably tell I'm a big fan of Maggie's work and am terribly proud of her. If you haven't been to her site you're missing out on something wonderful.

As always, thanks for stopping by.